Effective Feb. 27, 2015, the new Shipwire V3 UI (User Interface) is being released for General Availability. For more information on all the enhancements, please visit our blog post.
Please note which version of the application your account is currently using, and follow the corresponding instructions below.
You can tell which version you are using by examining the URL after you login to your account.
V2 = app.shipwire.com
V3 = merchant.shipwire.com
This guide shows you how to add and define products in your Shipwire account. We recommend that you also read the Shipwire product configuration best practices guide. If you plan on shipping in bulk, make sure to read the related guide about bulk shipping optimization.
On this page
- Adding Base Products
- Adding Inner Packs, Master Cases, Pallets
- Adding Base Products via Spreadsheet Upload
- FAQ

Download the Configuring Your Products guide
Our printable Configuring Your Products PDF guide will show you how to set up your product catalog. Learn the best practices and get a step-by-step guide for setting up units and cases.
Adding base products
Adding and configuring base products can be in two different ways – manually through our interface, or by uploading a spreadsheet.
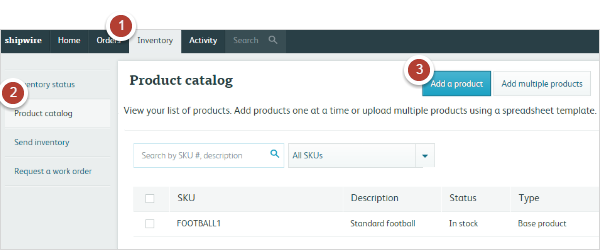
- In your Shipwire account, click the “Inventory” tab in the top navigation menu.
- Click on Product Catalog.
- Click on Add Product.
- Choose “Base Product”, then click Add.
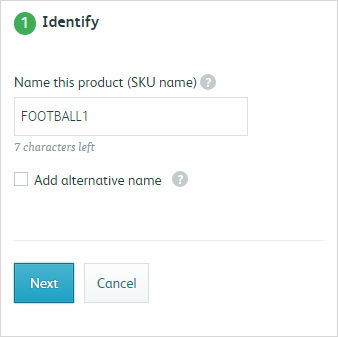
- Enter an appropriate SKU.
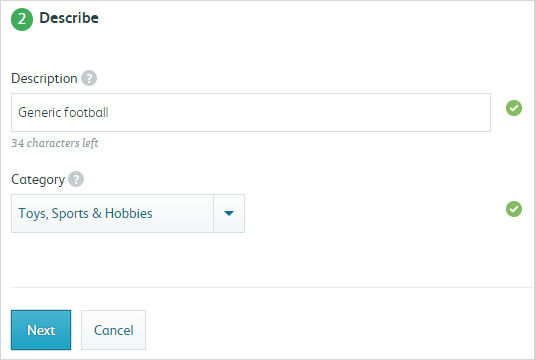
- Enter a customer facing description of your base product, then select the closest matching category.
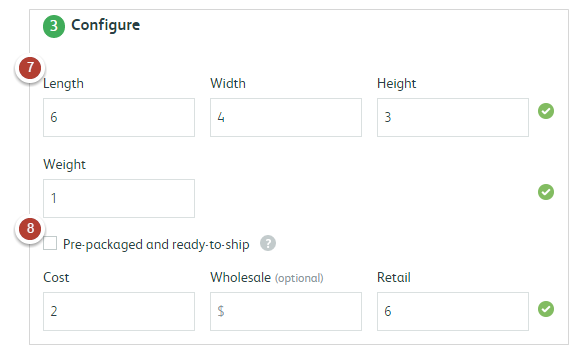
- Fill out the dimensions and weight of you base product, as well as its cost and retail value.
- If your product is “Pre-packaged and Ready-to-Ship” as soon as it arrives at our Fulfillment Center, check this box.
- Note: If your product comes in Bulk Packaging, you can define those product types in this step as well. Please refer to the “Adding Inner Packs, Master Cases, Pallets” section below for detailed instructions.
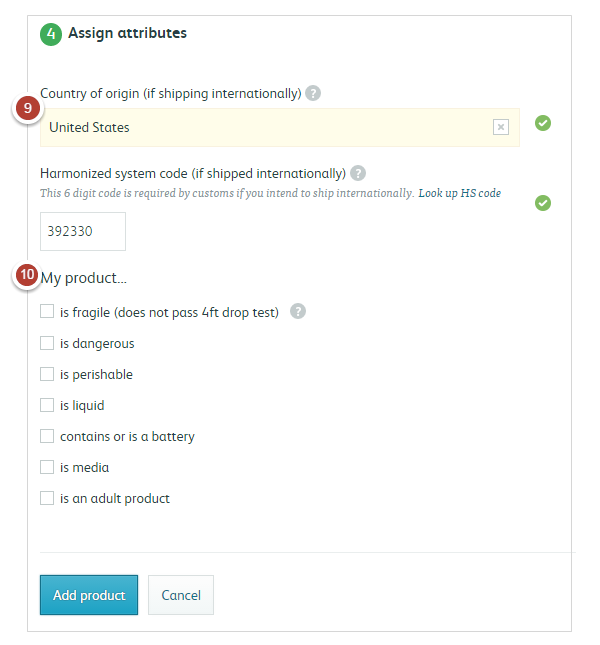
- For international shipments, enter the country of origin and the HS code of your product.
- If your product requires special handling and falls into one or more of these categories, check the appropriate boxes.
- Click on Add product to complete adding your base product.

Adding Inner Packs, Master Cases, Pallets
Inner Packs, Master Cases, and Pallets can be defined initially while adding your base product individually or via spreadsheet. You can also define these packaging levels for your individual existing SKUs by following the below steps:
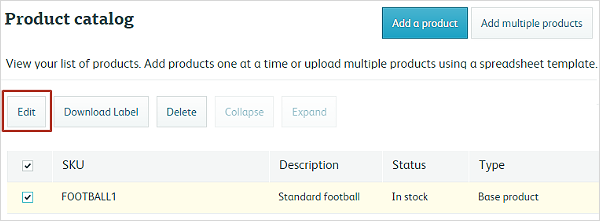
- In your Shipwire account, go to the Product Catalog tab as instructed above, then check the box next to the SKU, then click “Edit”.
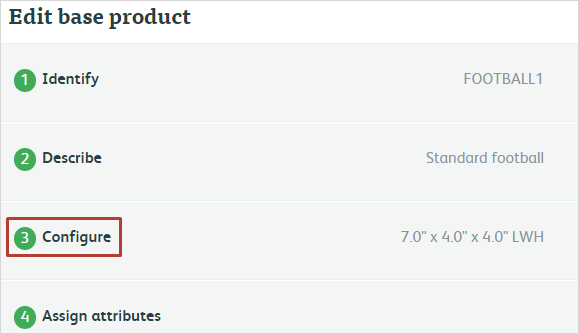
- Click on the Configure tab. (You can also reach this step when initially creating your SKU)
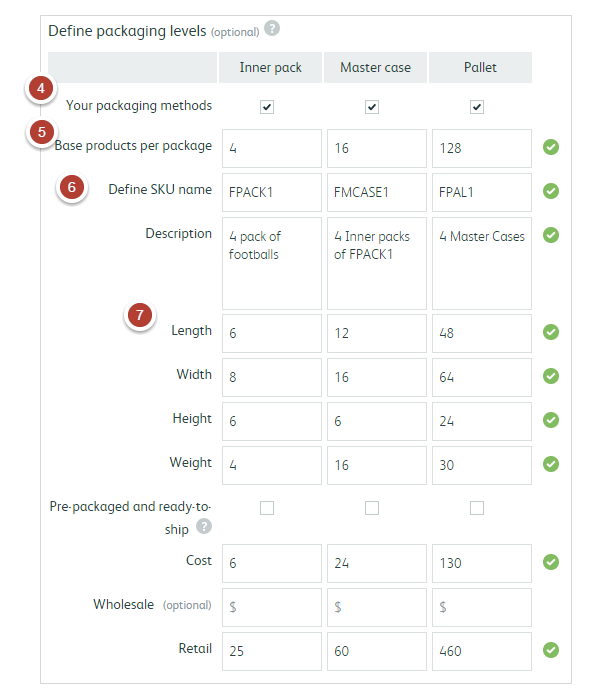
- Scroll down below the dimensions of your base product to locate the define packing level section
- Indicate the types of bulk packaging your SKU will use, by checking the box and filling in the values. (Inner Pack, Master Case, Pallet. Learn more about Bulk Packaging)
- Enter the amount of Base Products per packing level.
- Enter a unique SKU for your packing levels.
- Fill out the rest of the fields, then click next
- Click save changes
Adding Base Products via Spreadsheet Upload
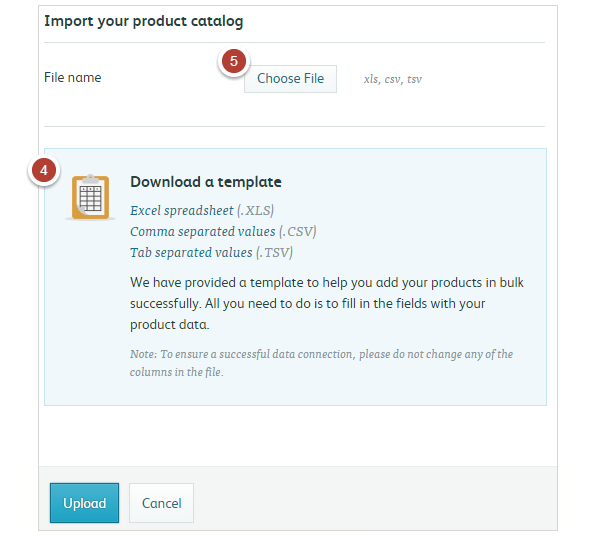
If you prefer to enter your product via spreadsheet, you can do so by downloading our template, entering the product information, and then uploading the spreadsheet in one batch.
If you are adding products via spreadsheet for the first time, you can also define bulk packing levels as well within the spreadsheet.
- In your Shipwire account, click “Inventory” in the top navigation menu.
- Click on Product catalog.
- Click on Add multiple products.
- Download our spreadsheet template, clicking on your preferred format (XLS, CSV, or TSV).
- Read the instructions carefully. Fill out the appropriate fields. You will be required to fill out the same information about your base product as above, such as dimensions, cost and retail value, country of origin and HTS code, and whether the product is perishable, dangerous, or fragile.
- You can also define your packing level using the spreadsheet. SImply follow the template instructiosn for the inner pack, master case, and/or pallet fields, making sure to enter unique SKUs for each level used.
- Once you have filled out and saved your spreadsheet, click on “Choose File” to select your saved spreadsheet, then click Upload.

FAQ
Q.If I don’t sell items at a master case level why do I need to set up SKUs like this?
A.Shipwire will inventory your items at the level at which you tell us to receive them, as specified in your receiving order.
Storing product in larger case-packs will ensure you keep your storage costs to a minimum, while also allowing you to ship out bulk quantities without having to pay for many picks.
This is useful in cases of recalls or defective products that need to be sent out in bulk. There are also times, you may have a slow moving SKU and you want to ship it back out or dispose of it. In other cases, such as when sending products to trade shows, being able to ship in bulk means saving on handling.
This type of SKU structure also gives our fulfillment centers an understanding of what your item master looks like before your product even gets in. In general, most shipping problems are due to receiving errors, so it helps us prevent issues in the future by better understanding how your products SKUs are set up.
Q.Can I update existing bulk products via a spreadsheet?
A.Yes. When uploading a spreadsheet containing already defined SKUs, Shipwire will check and update any changes reflected in your spreadsheet.
Q.Why are my SKUs under review?
A.Large items need to be manually reviewed by our team, in order to avoid problems or questions later. The review process typically takes 1 business day. If you find your SKUs under review for more than 1 business day, and you are in a rush to get started, please feel free to contact us.
Q.How do I handle product variants?
A.If your product has variants, such as size or color, then you will need one SKU for each unique item. For example, if you sell a shirt in 3 sizes, then you need one SKU for each size (e.g. 3 SKUs total).
If they also come in 3 colors, you need another 3 SKUs each, bumping it up to a total of 9 SKUs.
If you have master cases and/or inner packs that you want to sell wholesale, and you also want to sell the items inside individually direct-to-consumers, then please read more on shipping bulk products.
Q.When and how do I pay for the products I define?
A.You can define as many SKUs in Shipwire as you want, but you will only pay for inventory that is stored in our fulfillment centers. For example, if you have 200 SKUs in your account, but only 6 carry inventory, then Shipwire only regards you as carrying 6 SKUs. Further, if you stock out of one of the SKUs, and begin carrying stock for another SKU, then Shipwire will still only regard you as carrying 6 SKUs. Note that if you have a single product stored in several fulfillment centers, then that still counts as a single product and you are only charged for one SKU.
This guide shows you how to add and define products in your Shipwire account. We recommend that you also read the Shipwire product configuration best practices guide. If you plan on shipping in bulk, make sure to read the related guide about bulk shipping optimization.
On this page
- Adding units
- Adding units via spreadsheet upload
- Adding inner cartons
- Adding inner cartons via spreadsheet upload
- Adding master cartons
- Adding master cartons via spreadsheet upload
- FAQ
Download the Configuring Your Products guide
Our printable Configuring Your Products PDF guide will show you how to set up your product catalog. Learn the best practices and get a step-by-step guide for setting up units and cases.
Adding units
Adding and configuring products can be in two different ways – manually, or by uploading a spreadsheet.
- In your Shipwire account, click Store in the left navigation menu.
- Click on Add Product.
- Select the product type: Pick ‘n Pack, Lick ‘n Stick®, Insert, or Case.
- Enter an appropriate SKU and description.
- Fill out relevant product information, including country of origin and HTS code.
- Confirm that all information entered is correct, and click Save.


Adding units via spreadsheet upload
If you prefer to enter your product via spreadsheet, you can do so by downloading our template, entering the product information and then uploading in one batch.
If you already have products defined in Shipwire and download a spreadsheet template, it will be automatically populated with the relevant information to save you time.
- In your Shipwire account, click Store in the left navigation menu.
- Click on Upload Spreadsheet.
- Click on one of the download options to download the spreadsheet template in your preferred format (XLS, TSV, or CSV).
- Read the instructions carefully. Fill out the appropriate fields. You will be required to fill out the same information about the product as above, such as dimensions, cost and retail value, country of origin and HTS code, and whether the product is perishable, dangerous, or fragile.
- Once you have filled out and saved your spreadsheet, click on Choose file to select your saved spreadsheet and click Upload.


Adding inner cartons
As with adding units, there are two ways of adding inner cartons – manually or by uploading a spreadsheet. Before you create an inner carton definition, you must have already defined the individual unit that the inner carton will contain.
- In your Shipwire account, click Store in the left navigation menu.
- Click on Add Product.
- Enter the product’s SKU (e.g.“BOTTLE-IC”) and description of the contents of the inner carton (e.g. “QTY 6 x BOTTLE”). You want to clearly define the quantity of units inside the inner carton.
Note: Your inner carton should be entered and physically labeled with a different SKU than the unit SKU it contains.If your inner carton is already marked with a SKU, for example “6BTLS1 BOTTLE-CASE”, then enter “6BTLS1 BOTTLE-CASE” as your inner carton SKU.
Units should also not be placed in multiple cases unless the cases contain only that item. For example, Product A should not be in both Case C and Case D.
- Select the Case tab.
- Enter the dimensions, weight, cost, and retail value of your inner carton. The cost and retail value will be auto-filled if they have already been defined for the individual unit the inner carton contains.
- Under the Case Contents field, enter the unit SKU in the Add SKU field, and select the correct unit SKU from the drop-down.
- In the QTY field, enter the number of units in the inner carton.
- Confirm that all information entered is correct, and click Save.


Adding inner cartons via spreadsheet upload
If you prefer to enter your inner cartons via spreadsheet, you can do so by downloading one of our templates, entering the inner carton product information and then uploading in one batch.
When you upload a spreadsheet of inner cartons, they will automatically be defined as Pick ‘n Pack. You will need to edit this inner carton and build the case relationship. To do this, click on Case tab and under Case Contents, enter the unit SKU that is contained in the inner carton.
Before uploading your spreadsheet, ensure that the description field is clearly defining the quantity of units inside the inner carton (e.g. “QTY 6 x SKU BOTTLE”).
- In your Shipwire account, click Store in the left navigation menu.
- Click on Upload Spreadsheet.
- Click on one of the download options to download the spreadsheet template.
- Read the instructions carefully, and fill out the appropriate fields. You will be required to fill out the same information about the product as above, such as dimensions, cost and retail value, country of origin and HTS code, and whether the product is perishable, dangerous, or fragile.
- Click on Choose file to select your saved spreadsheet and click Upload.
- When the spreadsheet is uploaded, find the newly-defined case and click Edit.
- Select Case as the product type.
- Define the units contained in the case. Information about cost, dimensions, etc. will be auto-populated if it has already been defined.
- Confirm that all information entered is correct, and click Save.


Adding master cartons
If your inner cartons are placed into a master carton then you will need to define this. The same rules apply to master carton SKUs as inner carton SKUs, but to define a master carton you must first be sure that you have an inner carton SKU defined.
- In your Shipwire account, click Store in the left navigation menu.
- Click on Add Product.
- Enter the product’s SKU (e.g.“BOTTLE-MC”) and description of the contents of the master carton (e.g. “QTY 2 x BOTTLE-IC”). You want to clearly define the quantity of inner cartons inside the master carton.
Note: Your master carton should be entered and physically labeled with a different SKU than the inner carton SKU it contains.
If your master carton is already marked with a SKU, for example “6BTLS1 BOTTLE-MASTERCARTON”, then enter “6BTLS1 BOTTLE-MASTERCARTON” as your master carton SKU.
- Select the Case tab.
- Enter the dimensions, weight, cost, and retail value of your master carton. The cost and retail value will be auto-filled if they have already been defined for the individual inner carton the master carton contains.
- Under the Case Contents field, enter the inner carton SKU in the Add SKU field, and select the correct inner carton SKU from the drop-down.
- In the QTY field, enter the number of inner cartons in the master carton.
- Confirm that all information entered is correct, and click Save.


Adding master cartons via spreadsheet upload
If you prefer to enter your master cartons via spreadsheet, you can do so by downloading one of our templates, entering the master carton product information and then uploading in one batch.
When you upload a spreadsheet of master cartons, they will automatically be defined as Pick ‘n Pack. You will need to edit this master carton and build the case relationship. To do this, click on Case tab and under Case Contents, enter the inner carton SKU that is contained in the master carton.
Before uploading your spreadsheet, ensure that the description field is clearly defining the quantity of units inside the inner carton (e.g. “QTY 2 x SKU BOTTLE-IC”).
- In your Shipwire account, click Store in the left navigation menu.
- Click on Upload Spreadsheet.
- Click on one of the download options to download the spreadsheet template.
- Read the instructions carefully, and fill out the appropriate fields. You will be required to fill out the same information about the product as above, such as dimensions, cost and retail value, country of origin and HTS code, and whether the product is perishable, dangerous, or fragile.
- Click on Choose file to select your saved spreadsheet and click Upload.
- When the spreadsheet is uploaded, find the newly-defined case and click Edit.
- Select Case as the product type
- Define the units contained in the case. Information about cost, dimensions, etc. will be auto-populated if it has already been defined.
- Confirm that all information entered is correct, and click Save.


FAQ
Q.If I don’t sell items at a master carton level why do I need to set up SKUs like this?
A.Shipwire will inventory your items at the level at which you tell us to receive them, as specified in your receiving order.
Storing product in larger case-packs will ensure you keep your storage costs to a minimum, while also allowing you to ship out bulk quantities without having to pay for many picks.
This is useful in cases of recalls or defective products that need to be sent out in bulk. There are also times, you may have a slow moving SKU and you want to ship it back out or dispose of it. In other cases, such as when sending products to trade shows, being able to ship in bulk means saving on handling.
This type of SKU structure also gives our fulfillment centers an understanding of what your item master looks like before your product even gets in. In general, most shipping problems are due to receiving errors, so it helps us prevent issues in the future by better understanding how your products SKUs are set up.
Q.Why are my SKUs under review?
A.Large items need to be manually reviewed by our team, in order to avoid problems or questions later. The review process typically takes 1 business day. If you find your SKUs under review for more than 1 business day, and you are in a rush to get started, please feel free to contact us.
Q.How do I handle product variants?
A.If your product has variants, such as size or color, then you will need one SKU for each unique item. For example, if you sell a shirt in 3 sizes, then you need one SKU for each size (e.g. 3 SKUs total).
If they also come in 3 colors, you need another 3 SKUs each, bumping it up to a total of 9 SKUs.
If you have cartons that you want to sell wholesale, and you also want to sell the items inside individually direct-to-consumers, then please read our tutorial on uploading bulk products.
Q.When and how do I pay for the products I define?
A.You can define as many SKUs in Shipwire as you want, but you will only pay for inventory that is stored in our fulfillment centers. For example, if you have 200 SKUs in your account, but only 6 carry inventory, then Shipwire only regards you as carrying 6 SKUs. Further, if you stock out of one of the SKUs, and begin carrying stock for another SKU, then Shipwire will still only regard you as carrying 6 SKUs. Note that if you have a single product stored in several fulfillment centers, then that still counts as a single product and you are only charged for one SKU.