About
Shopify is a hosted ecommerce platform in use by over 1,000,000 merchants from small to large. Shipwire has built an integration via an App available in the Shopify App Store.
| Connection Information | |
|---|---|
| Who developed integration: | Shipwire |
| Support Contact: | Website |
| Status: | No known issues |
| Integrated APIs | |
| Inventory: | ✔ |
| Order Entry | ✔ |
| Shipping Rates | ✔ |
| Tracking | ✔ |
On this page
- Features
- Connecting Shipwire with Shopify
- Setting up carrier-calculated shipping
- Configuring Shopify products for Shipwire fulfillment
- FAQ
- Troubleshooting
- Additional Information and Troubleshooting Tips
Features
Order Entry – Orders are submitted to Shipwire from your e-commerce store automatically via our Order Entry API. Once your online store receives an order, Shipwire takes care of the rest.
Order Tracking – All tracking information related to completed shipments is pushed automatically, including tracking information.
Inventory Status – Inventory counts are synced with your store from our warehouses.
Shipping Rates – Obtain real-time shipping rates at any time during checkout. Shipwire will return the most cost-effective rates, choosing from the best warehouse, packaging, and carrier available based on your Optimizer preferences. Please note this feature requires access to Shopify’s Carrier Services API, which is not included in all Shopify plans.
Connecting Shipwire with Shopify
Follow these steps to connect your Shipwire account with your Shopify store.
-
- First, if you would like to include real-time shipping rates from your Shipwire account in your Shopify checkout, you will need to determine if carrier-calculated shipping is activated within your Shopify account. Go to Settings > Shipping in your Shopify control panel and scroll down to the “Shipping zones” section. If you encounter the notice that states “Your current plan doesn’t offer this feature” (see screenshot below), then you will need to contact Shopify Support to switch to a plan with the Carrier Service API enabled before continuing with installation. If, instead of this notice, you see “Carrier-calculated shipping” with a link to “Manage carriers”, then you are all set and may continue with the instructions.
- If you do not enable Shipwire real-time rates for your connection, or choose to use some additional shipping options in your Shopify store, please read the incorrect shipping types section below with important information on how to make sure your shipping types are recognized properly when they get pulled into Shipwire.
- Log in to your Shipwire account and navigate to “Third party connectors“
- Click “Add connectors” at the top right and add Shopify (if Shopify appears greyed out and already checked, this means you already have a Shopify store set up – click Cancel and then click “Manage connectors” next to Shopify in the “Your Connectors” list, and then “add connection” on that page to add another)
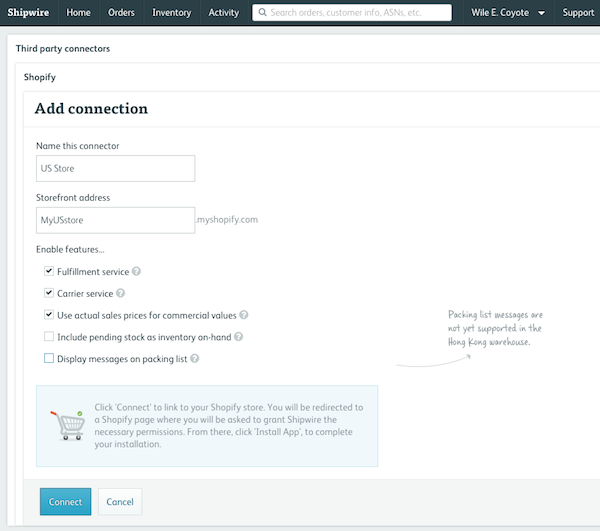
- Provide a name for the connection (if you have more than one Shopify store, this will help you distinguish between them in your Shipwire account), and choose the specific features you would like to enable, and agree to the terms. “Fulfillment service” should be checked if you plan to use Shipwire to fulfill some or all of your orders. Checking this does not automatically tag your products for Shipwire fulfillment, it just surfaces Shipwire as an available fulfillment method within Shopify. You will need to select which products you would like Shipwire to fulfill. Checking “Carrier service” allows you to present Shipwire-provided rates to your customers at checkout. Shipwire quotes shipping costs from the warehouse containing inventory closest to your customer, in the correct box size, and also shops rates across all available carriers to return the best rates for each service level (ground, 1 day, 2 day). The service allows you to add or subtract a certain dollar amount or percentage from the rates returned. Shipwire rates will only be included in your checkout flow when products with SKUs that exist in your Shipwire account are included in a customer’s cart. If you do not use Shipwire to fulfill all of your products, you may want to uncheck this feature, as there is not currently a way to blend shipping rates when some items on the order are being fulfilled by Shipwire and others are not. The “Include pending stock as inventory on-hand” option will add product that is on its way to Shipwire (not yet received) as part of sellable inventory count in Shopify and subtract backordered quantity (this is so that you cannot sell more than your good + pending quantities before the pending quantity is received). To be clear, note that this feature is only for those that want to presell their incoming inventory, causing backorders in Shipwire if you run out of good stock before the new stock arrives, but to not sell beyond the quantity of incoming inventory. The “Display messages on packing list” option will cause the contents of the Shopify “Note” field on orders to show on the packing list printed at one of our warehouses. This is great for including gift messages.
-
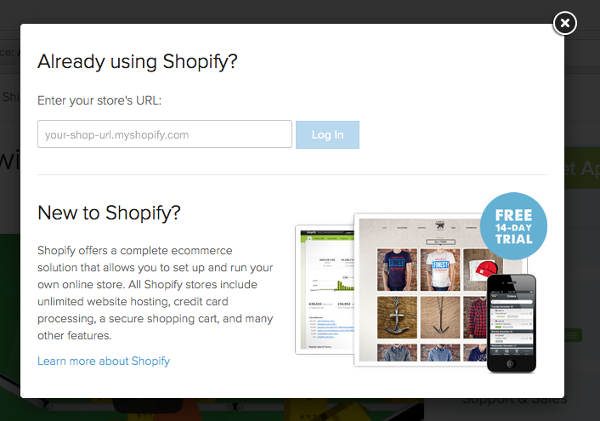
- After clicking “Connect”, you will be redirected to Shopify. If you are not already logged in to your Shopify store, you will be asked to enter your store URL and login information
- You will be presented with an authorization page that shows:
Shipwire Order Fulfillment hasn’t been reviewed by Shopify
Along with a button labeled “Install unlisted app”Please go ahead and click the button. We are working with Shopify to get listed as soon as possible, and this will not impact your integration.
Setting up carrier-calculated shipping
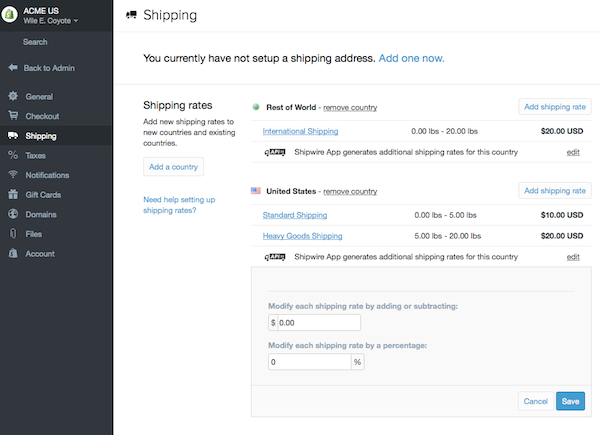
As long as you had the “Carrier service” feature checked when you installed the Shipwire App, you will have had a new Shipping Rate named “Shipwire App” added to your store for each region. This is visible at Settings > Shipping in the Shopify control panel. We recommend deleting any other rates (click the rate and then click the “Delete rate” button) so that the only options presented are Shipwire-provided rate quotes. Also, if you would like, you may add or subtract a certain amount from the Shipwire-provided rate quotes by clicking the “edit” link next to the rates for “Shipwire App”. In order for Shipwire rates to display in your checkout, you must leave “Automatically show new shipping services to customers when they become available” checked in your Shopify settings. If you uncheck it, you will see an error like “We don’t offer shipping to *Shopify Shipping Zone name*” in the Shopify checkout.
IMPORTANT: For best results, do not mix the Shipwire rating module with Shopify’s carrier specific modules (FedEx, UPS, USPS). The carrier-specific modules do not have the concept of multiple warehouses in multiple countries and can only generate a single price from the location you have designated in your Shopify store.
Configuring Shopify products for Shipwire fulfillment
Now that the Shipwire App is installed, you can configure individual products to be fulfilled, as well as set product inventory levels to be kept in sync using the Shipwire inventory sync service.
IMPORTANT: You must add products to Shipwire before setting the matching product in Shopify and tag it to “Shipwire App” location. Please also ensure that the SKUs are entered exactly the same in Shipwire and Shopify. SKUs are case-sensitive in Shopify. Ie “ABC123” and “abc123” are recognized by Shopify as different SKUs, and if you have one version in Shipwire, and the other in Shopify, the integration will not work correctly (at the very least, inventory will not sync at all). Please see the Configure and store product section of our support area for more details.
New products
-
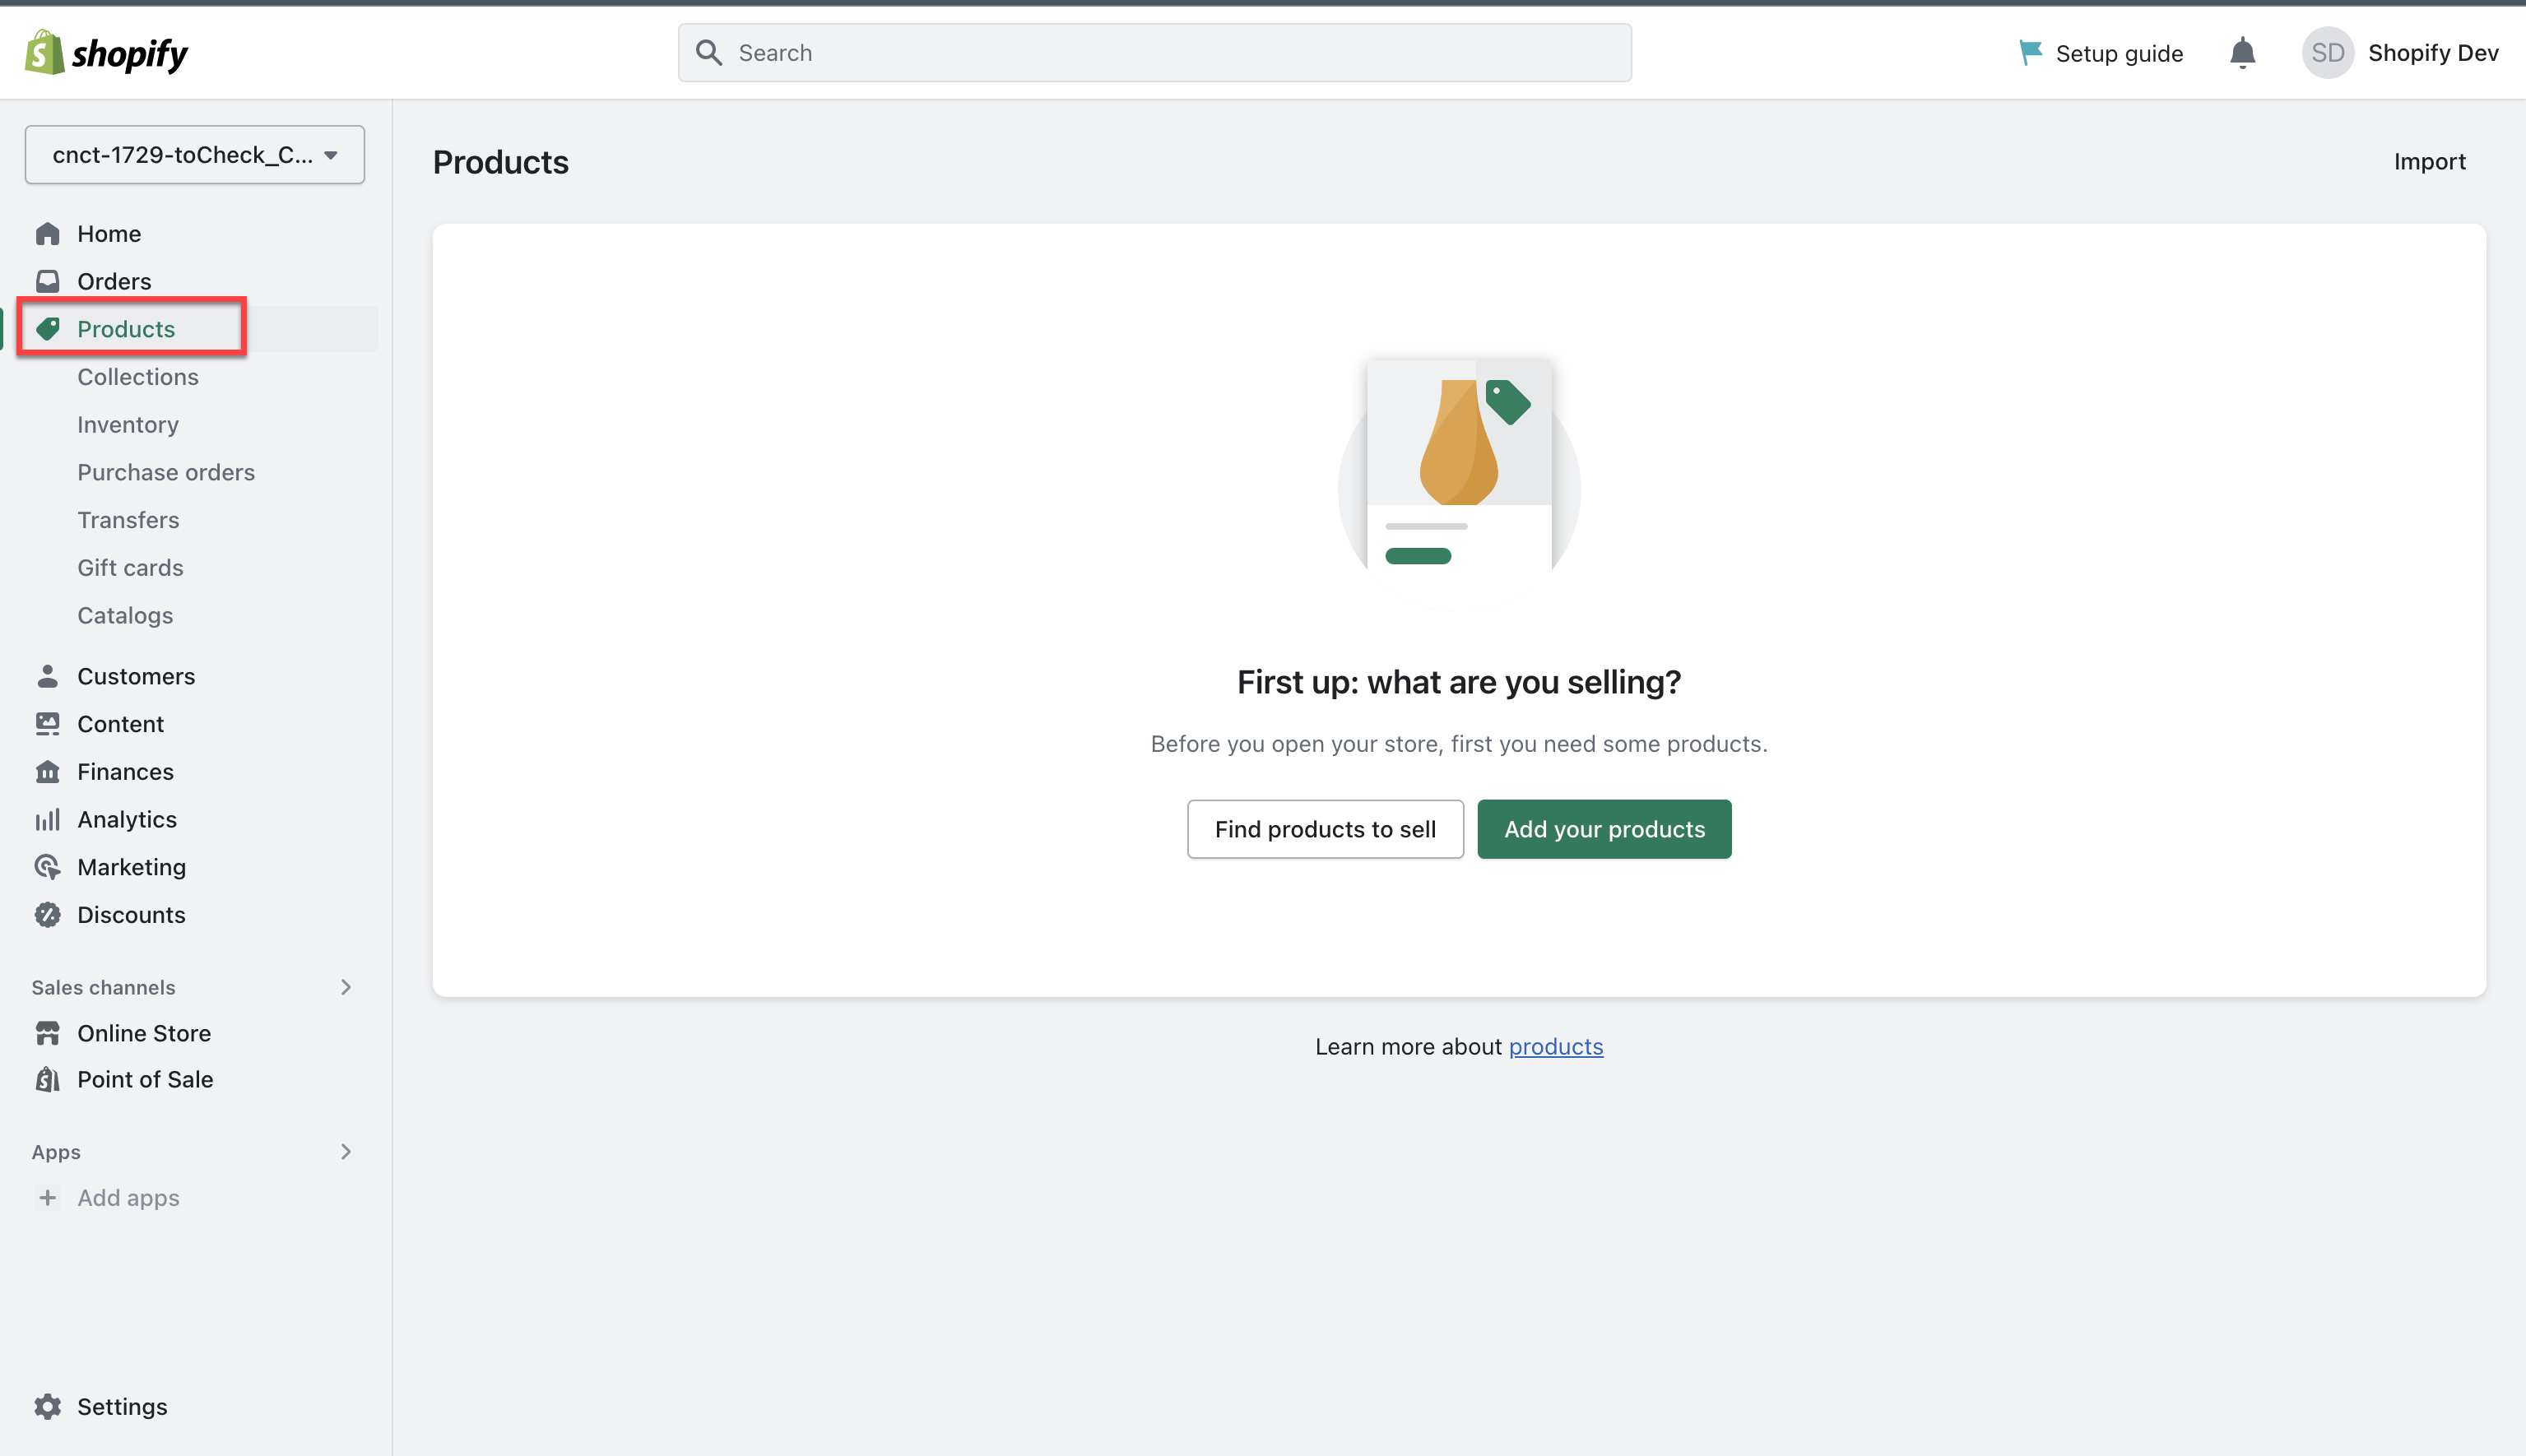
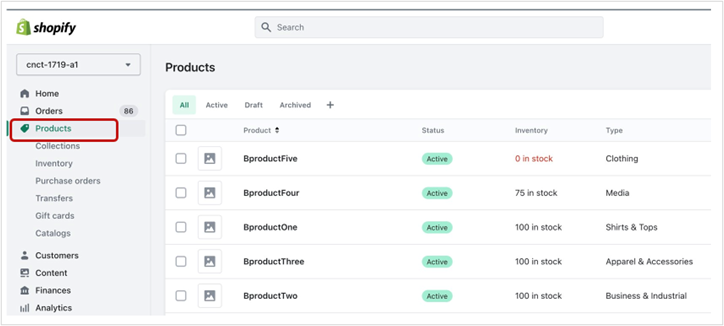
- Use the left navigation bar to select the Products tab. If you have not created a product, do so by clicking the Add a product button and proceed to the next step.
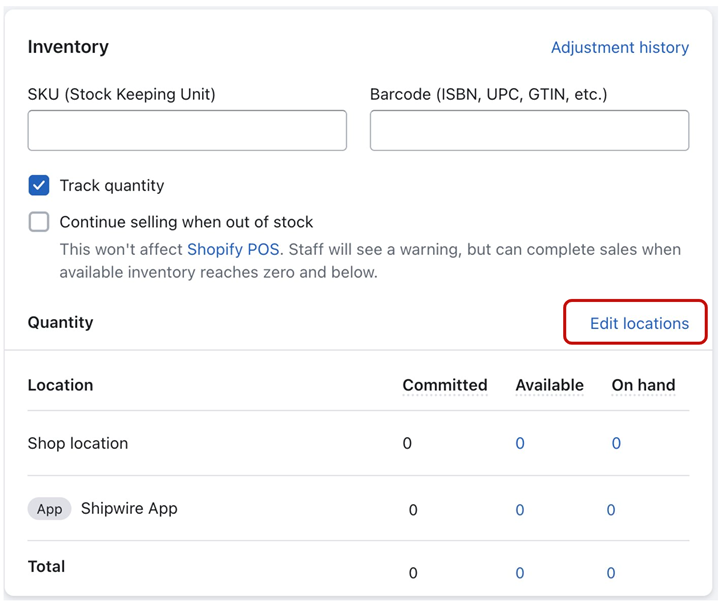
- Scroll down to the Inventory section which is part of Add your products workflow.
- Click on the Edit locations link.
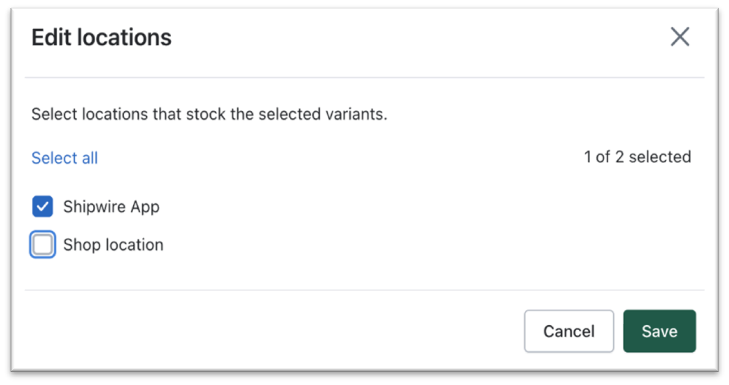
- On the dialog box, select the Shipwire app, but clear the Shop location checkbox.
- Click Save to retain changes.
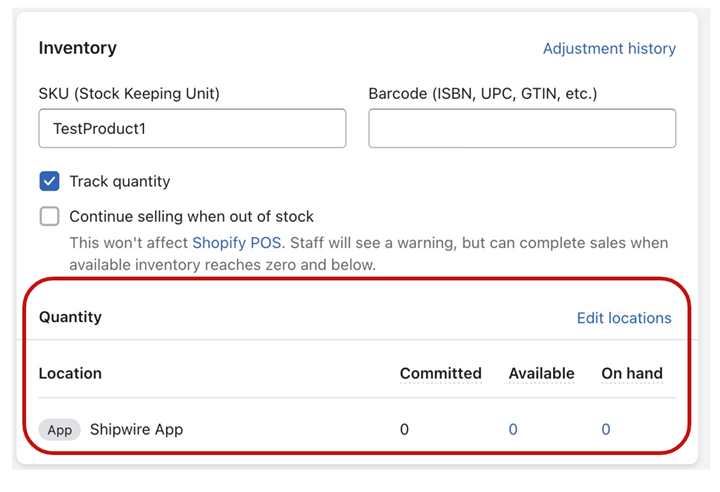
- Ensure Track quantity remains selected on the Inventory section on the Products screen.
This will cause any orders for the product to be sent to Shipwire, and for Shipwire to send inventory updates.
- Use the left navigation bar to select the Products tab. If you have not created a product, do so by clicking the Add a product button and proceed to the next step.
Existing products – change individually
- If you added products to your Shopify store before installing the Shipwire app, you may set products to be fulfilled by Shipwire individually (by individual product variant), or you may do so in bulk (the next section covers this).
- To begin enabling Shipwire fulfillment for a specific product, click on the product name.
- On the resultant screen, find the Inventory section.
- Click on the Edit locations link.
- On the displayed dialog box, select the Shipwire app but clear the Shop location checkbox.
- Click Save to save the changes.
- Ensure that the Track quantity checkbox remains selected on the Product screen.
You will see your products displayed like this on the Products menu.
This will cause any orders for the product to be sent to Shipwire, and for Shipwire to send inventory updates. (Refer to the screenshots of Step # 6 in the New Products section).
Existing products – change in bulk
- To change your products in Shopify from Shop location to the Shipwire App location in bulk (all at once), go to Inventory displayed under the Products menu.
- You will see all your SKUs (or, if you have more products than Shopify can display on one page, there may be multiple pages, indicated by left and right arrow buttons at the bottom of the screen, in which case, make sure to go through *all* of your product listing pages).
- Select the top-most checkbox under All, and then click Bulk edit.
- On the grid displayed, click Columns on the top right-hand side, and add the following fields manually – Track quantity, Continue selling when out of stock, Shop Location, and Shipwire App fields.
- To change to the Shipwire App location for a product, double-click the cell under the column titled Shop location – Available or Shop location – On hand that currently has a numeric value in it.
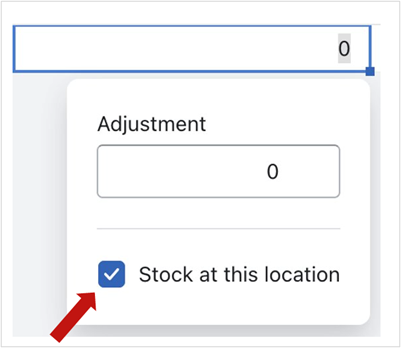
- On the resultant Adjustments dialog box, clear the Stock at this location checkbox.
- Ensure that Shop location – Available and Shop location – On hand display updated text – “Not stocked” under it for the product.
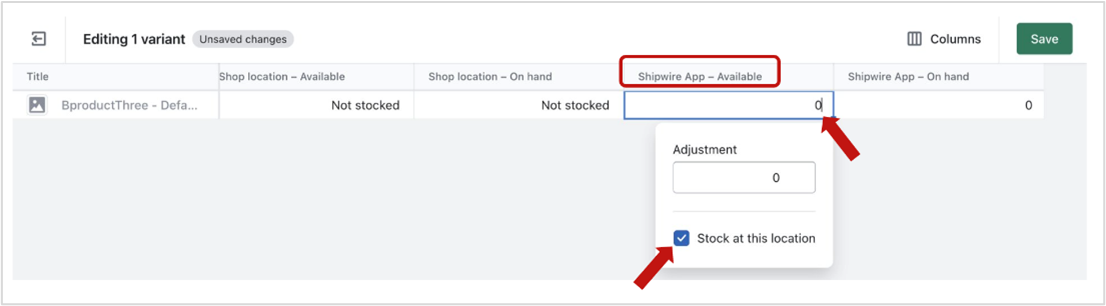
- Double-click on the Shipwire App – Available or Shipwire App – On hand column cell for the same product and select Stock at this location and ensure it no longer has “Not stocked” text in the cell for the product under Shipwire App – On hand or Shipwire App – Available cells.
- Click Save.
- To change multiple products at once, click the top-most Shop Location cell/field and hold Shift on your keyboard and click the bottom-most one.
- Click Save at the top of the screen after you’ve made the changes.
- After changing Shop location to Not stocked, ensure Shipwire App -Available/On hand columns do not have “Not stocked” text in it but “0” in them.
- In the same way, select the Track quantity checkbox for all products as well.

The Shipwire App locations should have numeric values and Shop locations must display “Not stocked”.

Note: With multiple items selected, any change you make in the drop-down selection to the top-most item will be copied to all the others.
Note: We also recommend ensuring that the Continue selling when out of stock checkbox is not selected, as that will cause you to oversell in your Shopify store and get backorders in Shipwire.
Sold line items
Now that you have enabled Shopify products to be fulfilled by the Shipwire App, you must instruct Shipwire to fulfill products when they’re sold.
Manual fulfillment
The default method in Shopify is for the merchants to manually submit orders to a fulfillment provider.
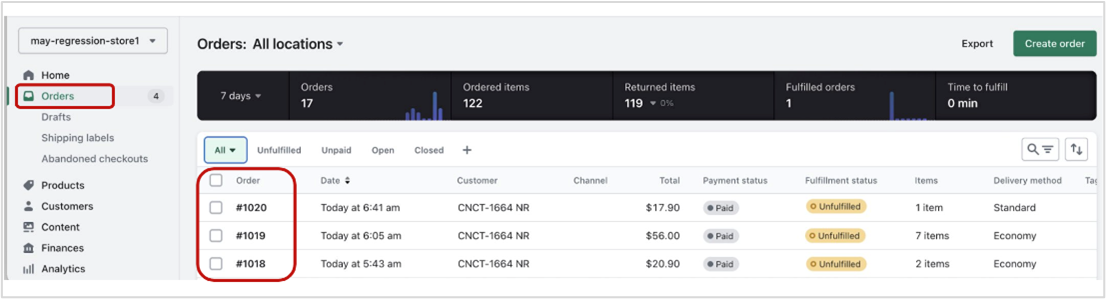
- Once you’ve received a new order after having switched your products to being fulfilled by Shipwire, use the left navigation bar and select the Orders tab.
- Click the corresponding order # hyperlink (found in the Order column).
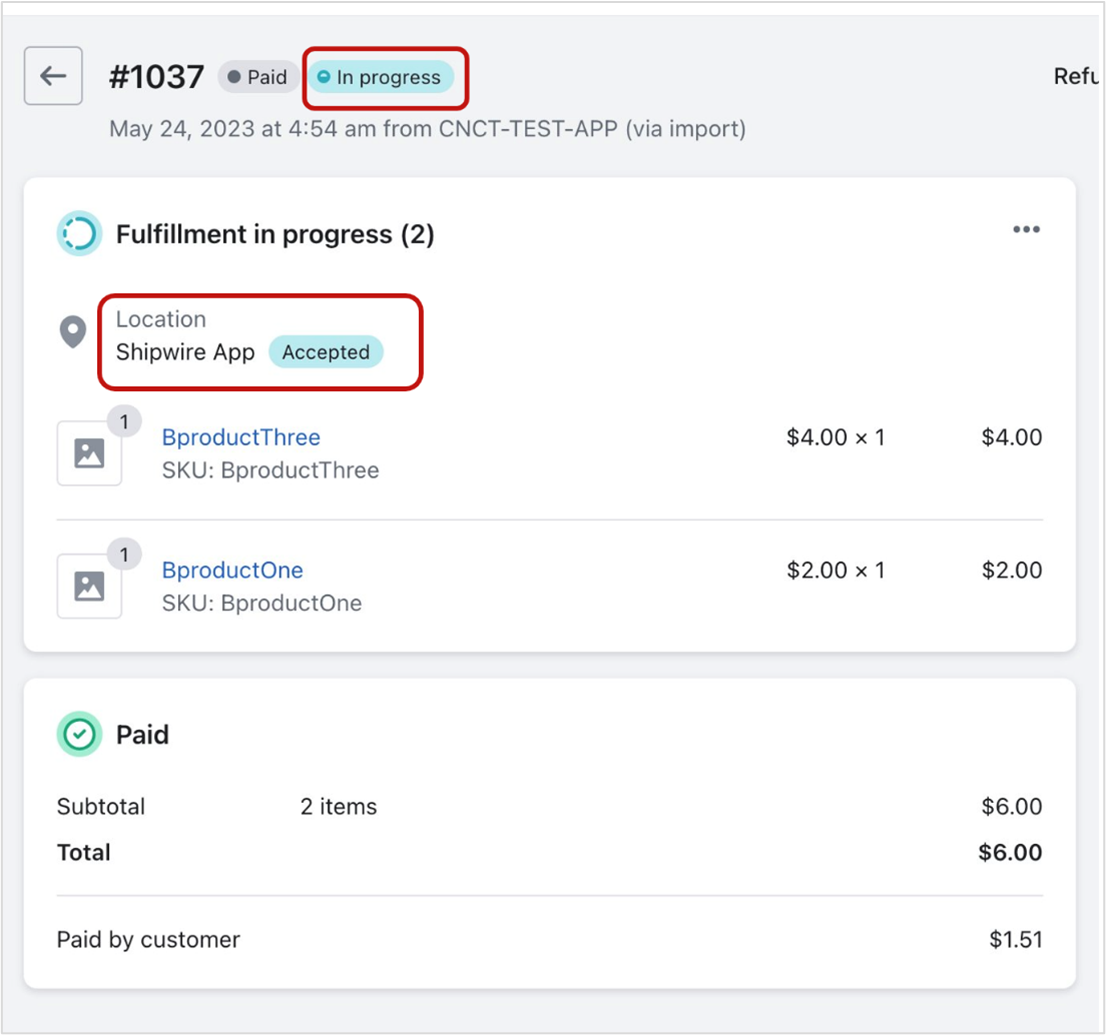
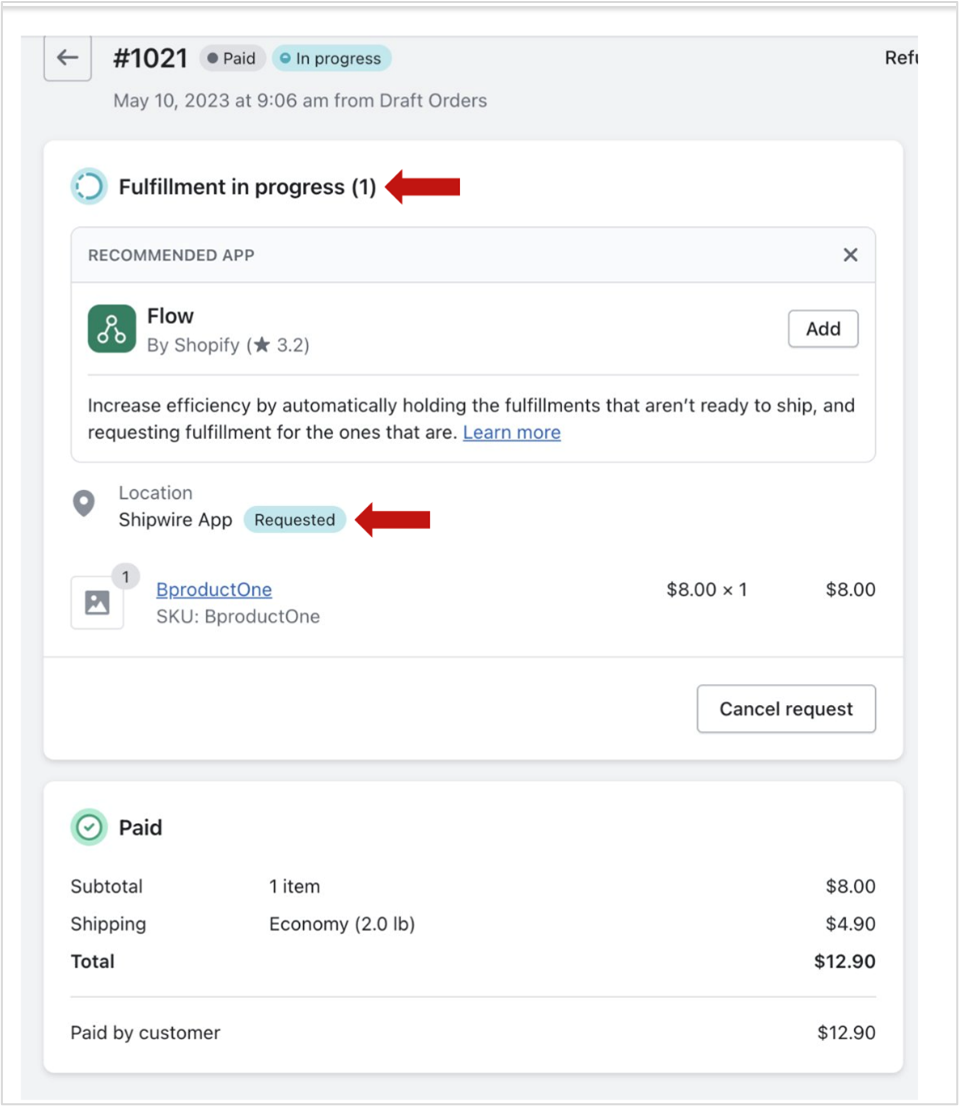
- At the top of the page, ensure that Location displays Shipwire App and then click Request fulfillment.
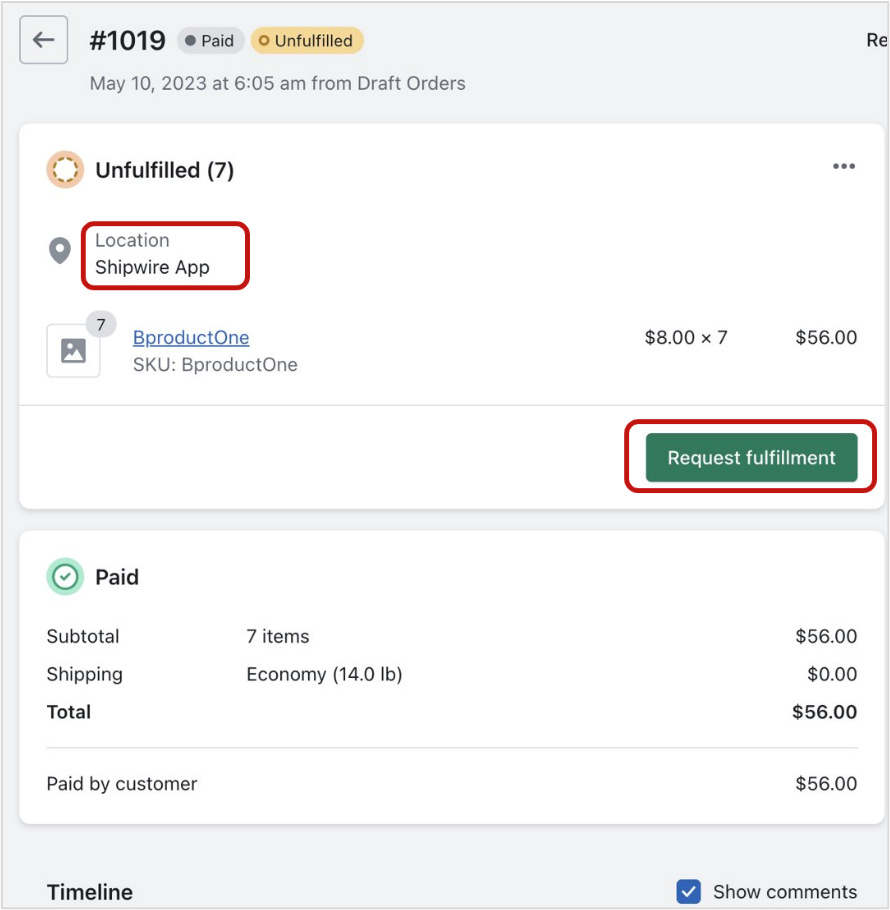
- On the resultant screen, if you prefer to send notifications on order fulfillment by Shipwire to the customer, select the Notify your customer when their order is fulfilled by Shipwire App checkbox and then click Send fulfillment request.
Shipwire will be alerted to fulfill the order.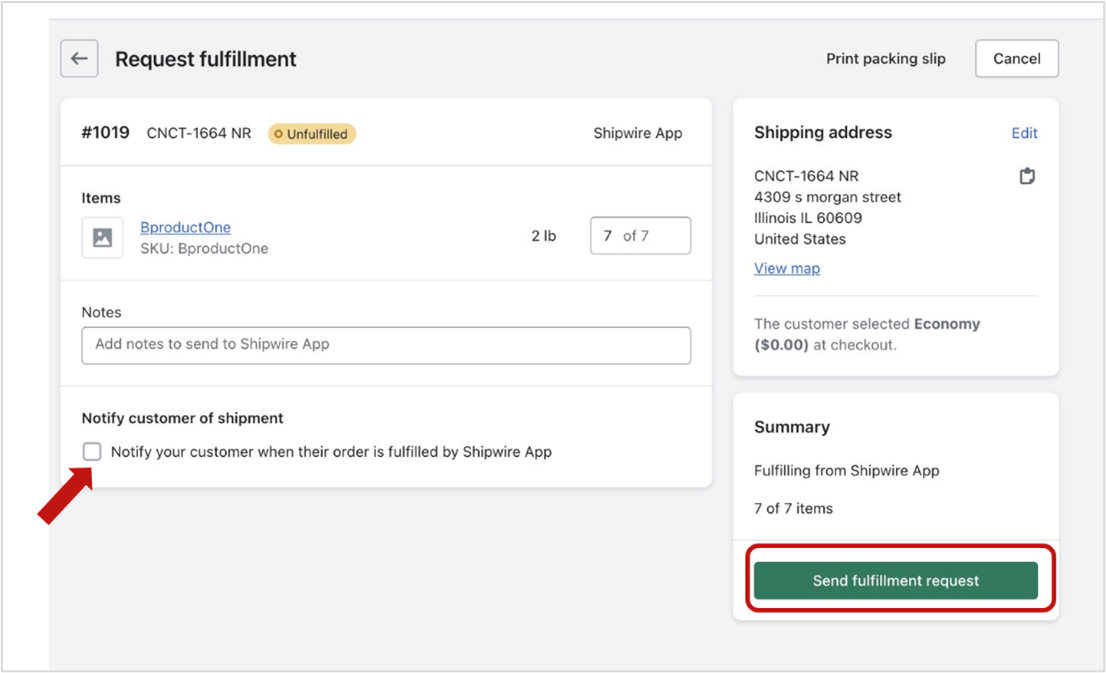
On the Order page, you should be able see In progress and Requested/Accepted labels.
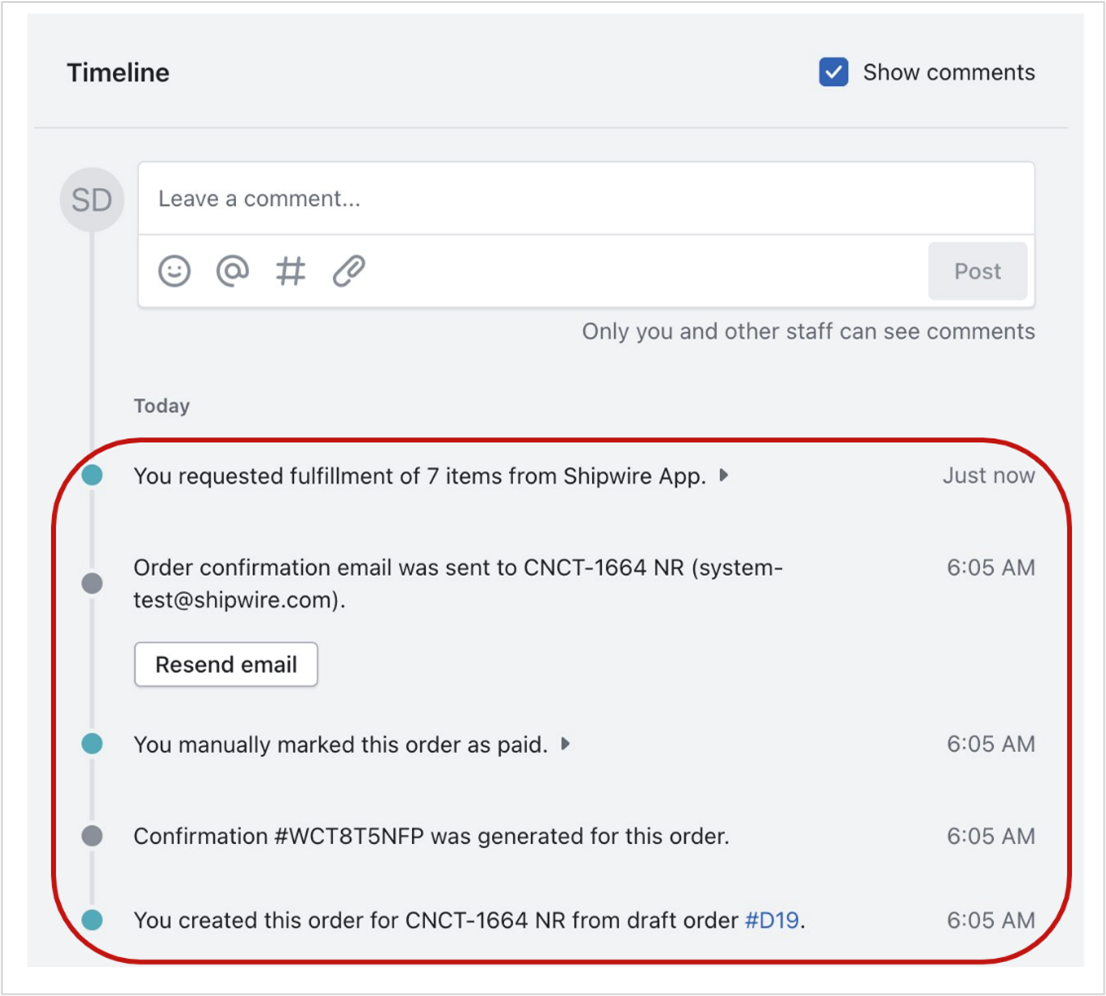
Additionally, you can view the details in the Timeline section as shown below.
Automated fulfillment
-
- If you prefer to have your successfully paid orders automatically sent to Shipwire for fulfillment, go to Settings > Checkout in your Shopify control panel.
- From the Checkout page, scroll down to the section entitled Order processing.
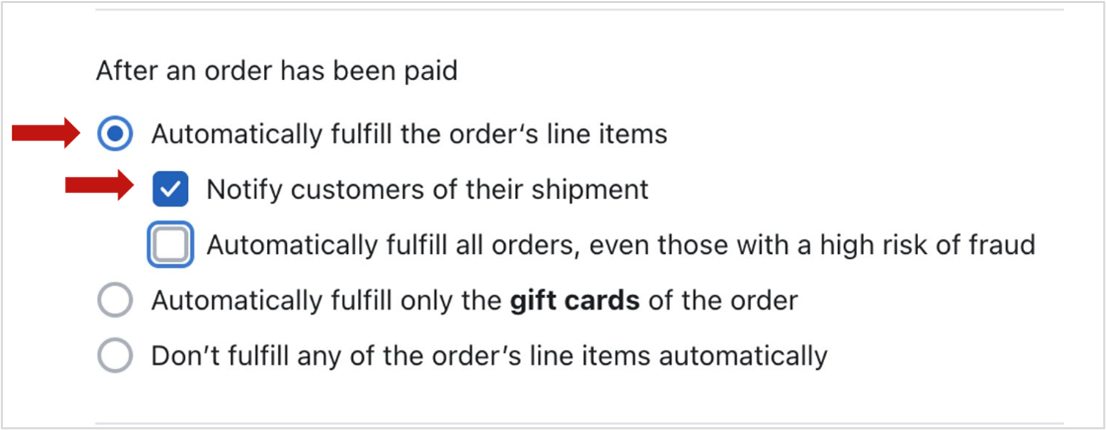
- Under the After an order has been paid heading, select the Automatically fulfill the order’s line items checkbox
- If you would like Shopify to send a message to your clients once the order has been shipped by Shipwire and includes a tracking number, select the Notify customers of their shipment checkbox.
- Click Save.
Shopify has more information on their Fulfill an order support page.
With Automatic fulfill order’s line items setting enabled, on receiving a new order with products to be fulfilled by the Shipwire App, Shopify will automatically send fulfillment request to Shipwire without the need to send fulfillment manually.
Location Priority
To facilitate Shopify in assigning priority to “Shipwire App” location over “Shop location” for fulfillment of orders having products that can be fulfilled by both Shipwire and Shopify, please follow the below steps.
-
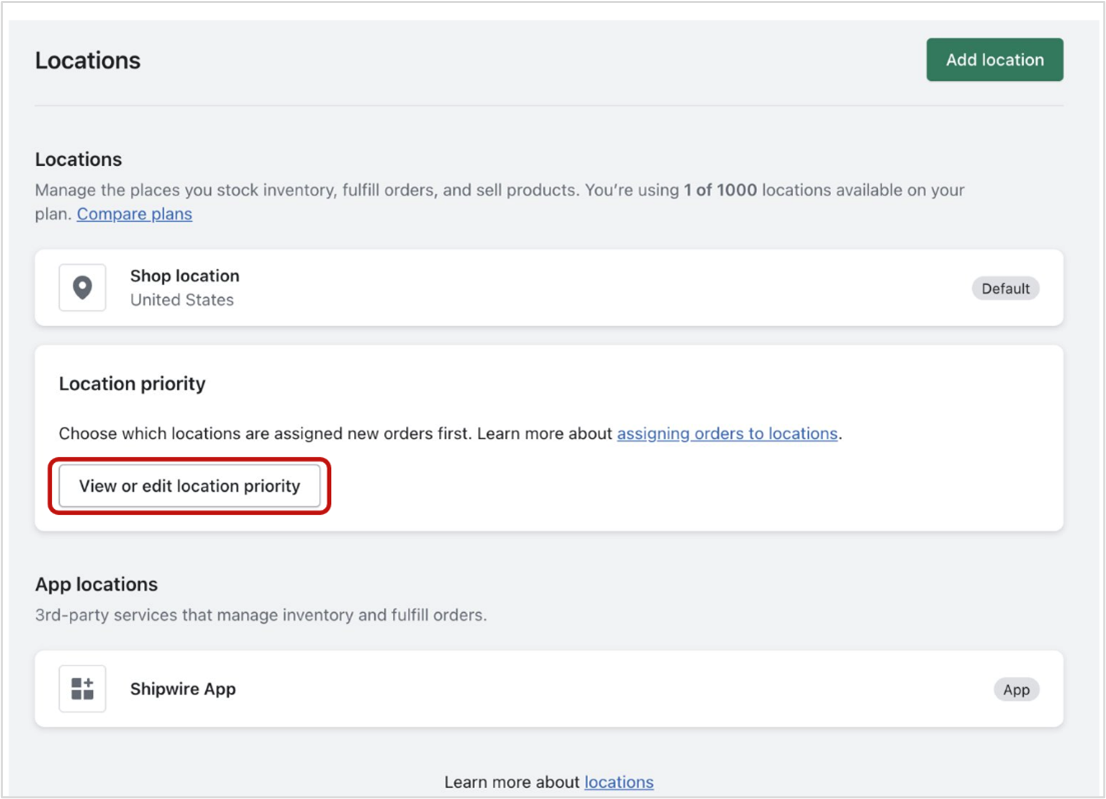
- Navigate to Settings -> Locations screen.
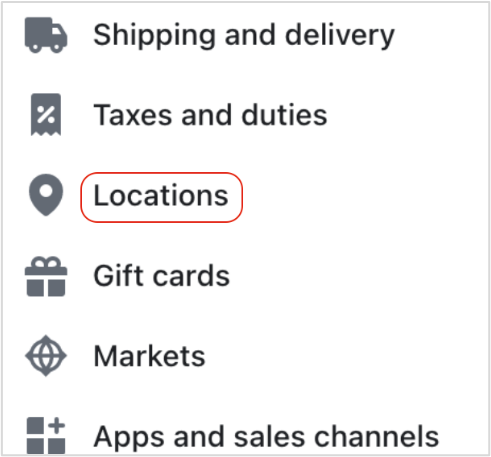
- Click View or edit location priority.
- Click and hold the dotted icon of Shipwire App with mouse and drag it to the first row.
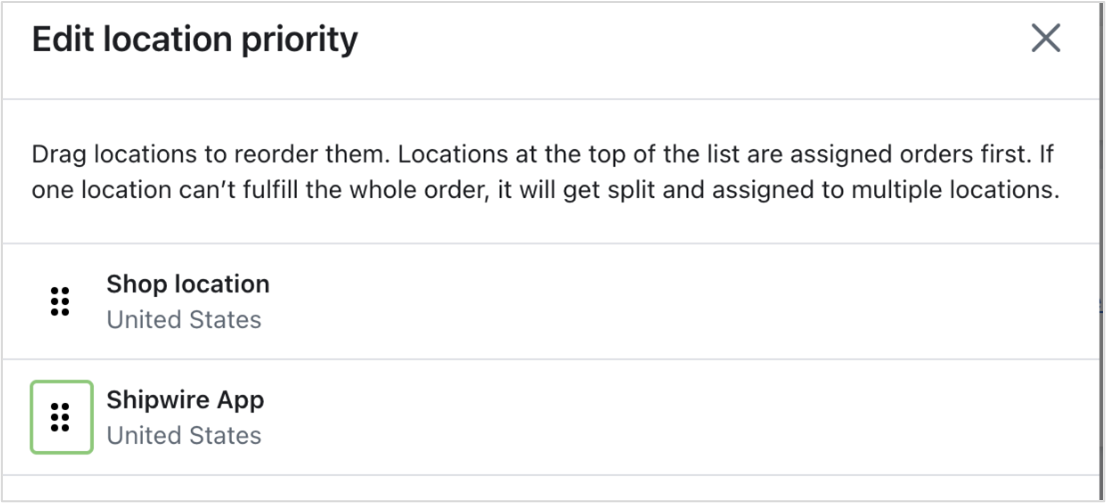
- Click Save.
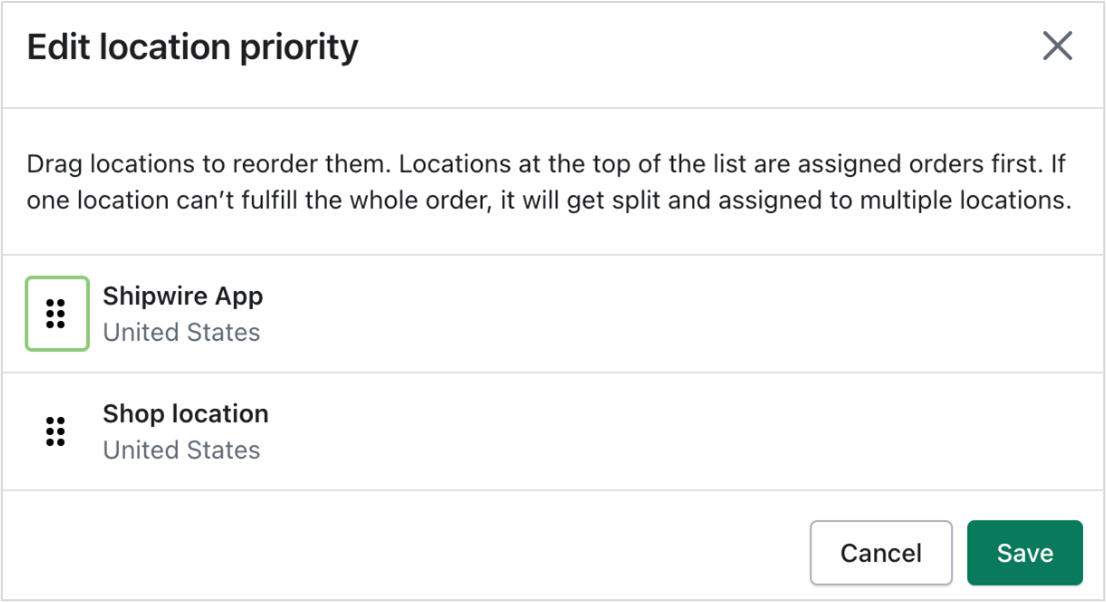
Note: Shopify will prioritize “Shipwire App” over “Shop location” when all the order line items are present in Shipwire App. If there are any missing items in the “Shipwire App” location, then Shopify will assign the order to “Shop location” instead of “Shipwire App”.
- Navigate to Settings -> Locations screen.
FAQ
Q. How do I edit or cancel an order in Shopify that has already been imported to Shipwire?
A. First, log into your Shipwire account and cancel the order (note that merchants with split order functionality turned on may have up to two orders in Shipwire, each assigned to a different warehouse). If you do not see the option to cancel an order, this means it has already been submitted to the warehouse and may not be canceled, so do not proceed with these instructions, and instead require the customer to initiate a return once the shipment is received. If you were able to cancel the order in Shipwire, open the order in Shopify, and click “Request cancellation” under the three dots in the “Fulfillment in progress” section. Click the three dots again and click “Revert to unfulfilled”. Once complete, this will allow you to edit or cancel the order. Once complete with editing, click “Request fulfillment” to send the order to Shipwire again with the changes. Be sure to check the box for “Notify your customer when their order is fulfilled by Shipwire App”, which is not checked by default. If you want to cancel the order, click “More actions” at the top of the page and click “Cancel order”.
If it happens frequently that you want to cancel an order in Shipwire that you’ve sent to us, you may wish to consider switching to manual fulfillment mode in your Shopify account to have full control over when orders are sent to Shipwire or reducing the frequency with which orders entered into Shipwire get automatically sent to the warehouse for shipment – see Configuring Order Transmit Times
Q. Why does the carrier name not appear for shipped fulfillment orders in Shopify?
A. Shopify presently only supports a limited number of carrier names being passed back to them. This is: UPS, USPS, Canada Post, FedEx, GLS, DPD, Purolator, Australia Post, Passport, Royal Mail, and TNT. If we ship with any other carrier, which of course we do, when we pass this to Shopify, they do not display it. Please contact Shopify support directly about this issue to let them know that you would like them to display whatever carrier name your fulfillment provider sends to them, rather than filtering it against their static, small list of carriers.
Q. Why is my inventory not syncing?
A. Most likely this is due to a setup error in your Shopify store.
First, ensure that you have checked the “Track quantity” box in Shopify for all of your products that Shipwire fulfills. Second, ensure that you have added “Shipwire App” as a location. The easiest way to check this is by doing a bulk edit in Shopify of all your products. See this section on how to do that. Note that if you change this setting from “Shopify” to “Shipwire App”, you may need to wait until the nightly sync between 10 PM and 10 AM PST to see an update occur. If you need an update now, please leave set on “Shopify”, modify the value to the current value seen in Shipwire, and *then* change it to “Shipwire App”.
Second, ensure that your SKUs are entered exactly the same into Shipwire and Shopify. SKUs are case-sensitive in Shopify. Ie “ABC123” and “abc123” are recognized by Shopify as different SKUs, and if you have one version in Shipwire, and the other in Shopify, inventory sync will not work. Change the SKU name in Shopify to match what you have in Shipwire. In the Shopify control panel, please click on the product in question, then check the SKUs given under “Variants”. Copy the SKU, and then search in the Shipwire UI by clicking “Inventory” then “Product catalog” and pasting the SKU in the search box on that page. If you find the SKU (and it has the same case), but inventory has not synced – was the SKU or “Track quantity” setting for this product variant changed in Shopify today? If so, inventory may not sync until between 10 PM and 10 AM PST.
If none of the above applies, please click “Edit” for the Shopify Product variant in question in your Shopify control panel and provide us with the URL you see in the browser so we can troubleshoot further. i.e: https://admin.shopify.com/store/store_name/products/7389545234499 or https://admin.shopify.com/store/store_name/products/7389545234499/variants/42168929812547. Also take a screenshot of the “view inventory history” page for the Shopify product variant, and let us know what changes you made to the product recently (changed SKU, changed “Stocked At” or track quantity/inventory managed by setting, etc).
Q. Why does “REDACTED” show for name, address, phone, email on some of my older Shopify orders in Shipwire?
A. Shopify requires that all apps comply with their customer data protection guidelines. One of the requirements is to remove personally identifiable information (PII) from orders we have imported from them. In order to comply with this requirement, we replace this PII with “REDACTED” at 180 days after the order has been shipped. If you need this information on older orders, please retrieve it from your Shopify store.
Q. How often will inventory sync with my Shopify store?
A. We do one full (both negative *and* positive deltas) inventory sync per Shopify store between 10 PM and 10 AM PST, any time there have been no changes to good stock levels for any SKUs, and no new orders that have not yet consumed good stock, within the last 5 minutes. Syncing positive deltas only under these conditions and this time of day is absolutely necessary to eliminate all of the issues that we discovered with the traditional Shopify inventory sync method. In addition to this once per night sync, we have implemented a negative only delta sync that we run inbetween full syncs. We check Shopify levels versus Shipwire levels every 30 minutes at 22 and 52 minutes after the hour, and send negative deltas only. For example, if the Shopify value is greater than the Shipwire value, we reduce the Shopify value to what Shipwire shows. If, on the other hand, the Shipwire value is higher than the Shopify value, we do not increase the value at this point, because there is a very good chance that this will cause us to inflate inventory on the Shopify end and increase the risk of overselling (this is due to the possibility of there being orders from Shopify that were imported in the last few minutes which have not reduced good stock within Shipwire yet).
Q. Can I take pre-orders with Shopify for inventory not yet at Shipwire?
A. Absolutely. Simply check the “Allow users to purchase this item, even if it is no longer in stock.” box when adding/editing a product in Shopify, along with choosing “Shipwire App” for fulfillment. Please make sure that you have the SKU added to Shipwire first, even though no inventory will be available for it. When the order is sent to Shipwire, if it is not yet in stock, it will go into a Backorder status and be shipped out as soon as stock is received. Also, to avoid having your customers charged until the orders are ready to ship, we recommend following Shopify guidelines outlined here. You may also want to read the answer to the question below as an alternate approach – How do I include pending stock as inventory on-hand?
Q. How do I include pending stock as inventory on-hand?
A. You may include “pending stock”, which is inventory that you have reported that you are sending to a warehouse, and so should be available soon, in the inventory quantities we send back to your Shopify store. This is useful if you would like to allow customers to purchase this inventory that is about to arrive at a Shipwire warehouse. To do this, in your Shipwire account, click the account drop-down in the top right, choose Third party connectors, click on “Configure” for Shopify, then click the appropriate Account name, then tick the checkbox for “Include pending stock as inventory on-hand” and click Update.
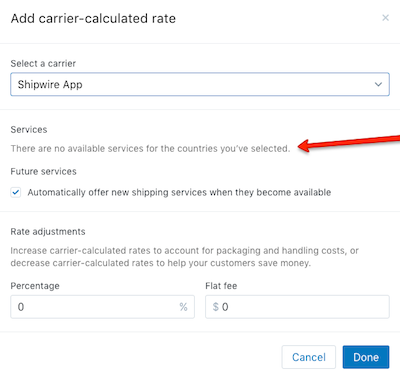
Q. Why am I seeing the message “There are no available services for the countries you’ve selected” in the Shopify admin panel under Settings > Shipping?
A. This can be safely ignored. It has zero impact on your integration. Shipwire does not send Shopify a list of all carriers and service that might get selected in the future. Instead, for each individual cart checkout, we send *only* the best options for that particular address, items in cart, which warehouse it will ship from, etc. You will see the “There are no available services for the countries you’ve selected” when you are adding the “Shipwire App” carrier-calculated rate to a brand new shipping zone in the Shopify UI. You will also see it when editing an existing Shopify shipping zone that has the Shipwire App carrier-calculated rate added. The important thing is to make sure you leave “Automatically show new shipping services to customers when they become available” checked in your Shopify settings.
Q. How do I add Shipwire real-time rates to a new Shipping Zone I created in Shopify?
A. Go to Settings > Shipping in the Shopify admin panel. Add a new zone, or edit an existing one. Under the “Carrier-calculated rates” section, click “Add rate” and pick “Shipwire App” as the carrier, and click “Done”. You may ensure that the zone is working by putting a Shipwire-fulfilled item in your Shopify cart and attempting to check out with an address in the zone you just created. You should see Shipwire rates provided.
Q. Why are orders marked as potentially fraudulent in Shopify being sent to Shipwire?
A. If you have chosen automatic fulfillment of orders (see manual vs automatic fulfillment above), please note that, by default, orders that Shopify determines are of a high fraud risk potential are not automatically sent to Shipwire for fulfillment. If you find that high risk orders are making their way through, please check the following setting in your Shopify admin: First, click Settings, then click Checkout. Find the Order processing section. Under the heading “After an order has been paid”, you should see that “Automatically fulfill the order’s line items” is already selected. Ensure that “Automatically fulfill all orders, even those with a high risk of fraud” is not checked. If you found that it was not checked, but high risk orders were still passing to Shipwire, please contact Shopify support, as they send these fulfillment creation requests to us.
Q. If I cancel a Shopify order in Shipwire, will it be canceled in Shopify?
A. No, the current integration will not cancel an order in Shopify after an order has been canceled in Shipwire, because you have the ability to duplicate the order in Shipwire after cancelling it. This also happens in rare events at the warehouse such as floor denials, when the original order is cancelled, inventory corrected, and a duplicate is created and either routed to another warehouse with the required stock or placed on backorder to indicate that sufficient inventory was not available at any warehouse.
Q. How do I cancel an order in Shopify that shows an “in progress” fulfillment status?
A. Shopify substantially changed the fulfillment workflow in 2020, which removed your ability to cancel fulfillments within Shopify. This means that you cannot cancel the order in Shopify. However, you can still do a manual refund on the order. Note that having fulfillments “in progress” in Shopify does not impact Shipwire’s ability to reflect accurate inventory levels in the Shopify store. Please also ensure that you have cancelled the order in Shipwire.

Q. I selected to have the “Carrier service” feature enabled during installation, but shipping rates are not displaying at checkout and I can’t see a Shipwire rate under Shipping Rates in the Shopify control panel. What is wrong?
A. The carrier service feature requires access to Shopify’s Carrier Services API, which is not included in all Shopify plans. If Carrier Service is not enabled on your store, then we will not be able to provide shipping rates. To determine if this is causing your issue, go to Settings > Shipping in your Shopify control panel and scroll down to the “Carrier calculated shipping” section. If you encounter a yellow notice that states “Your current plan doesn’t support carrier-calculated shipping”, then you will need to contact Shopify Support to switch to a plan with the Carrier Service API enabled. Once you have access to the Carrier Service API for your store, you will need to edit the configuration of your Shipwire Shopify app to appropriately enable real-time rates. To do this, in your Shipwire account, click the account drop-down in the top right, choose Third party connectors, click on “Configure” for Shopify, then click the appropriate Account name, then tick the checkbox for “Carrier service” and click Update.
Q. Why are Shipwire real-time rates not showing up in the Shopify checkout?
A. Please check the above question and answer first, as that is the most frequent issue. If you’ve checked that and are still having an issue, here are things to check: 1) make sure that the items you have placed in the Shopify cart to test real-time rates with have “Shipwire App” picked as the “Stocked at” location under “Products” in the Shopify control panel, that the SKU matches what you’ve loaded into Shipwire, and that you’ve entered the weight and dimensions for the product in the Shipwire control panel. If any of this is missing, we will be lacking the necessary information to calculate a rate. 2) Make sure that you do not have “hold” chosen instead of “process” for any shipping methods in “Shipping Preferences” in the Shipwire control panel – if you have “hold” picked, we will not be able to provide a real-time rate at checkout for that method, since you’ve chosen to apply shipping method manually.
Q. How can I run a wholesale (B2B) store through Shopify?
A. This article has some good suggestions and discusses this at length. You may wish to connect with a Shopify expert to assist with this. If you would like B2B customers to only be able to order mastercases, then only list your mastercase SKUs on your Shopify store. Do not follow the suggestion of “question #2” which has you create “case packs” with selectable quantities of 6,12,18,24, etc of your individual SKUs. That would create orders that would cause the warehouse to make individual picks rather than mastercase picks.
Q. Can I have multiple Shopify stores integrated with one Shipwire account?
A. Yes. Simply install the Shipwire App in as many Shopify stores as you would like. There are no other special considerations to take into account, and a good number of merchants are doing this already.
Q. Why are my customers not receiving emails with tracking details from Shopify?
A. Your Shopify store has settings that control whether these emails are sent or not. Please read the Manual vs automated fulfillment and shipping notifications section for the most common reason. Also note that if you manually request a fulfillment for an order (such as after requesting cancellation and editing the order in Shopify), you must check the box for “Notify your customer when their order is fulfilled by Shipwire App” under “Notify customer of shipment” in the request. Shopify has this box unchecked by default. Please also see the answer to the next question in the FAQ for a more rare scenario that may apply to your account.
Q. Why do only some tracking numbers, but not all, get emailed to the customer (or show in Shopify) for a given order?
A. Shopify made significant changes to how fulfillment apps function, which restricts how we can pass tracking numbers and mark fulfillments as complete. These restrictions ultimately result in this functionality: For orders split across two warehouses – whichever warehouse completes the order first, the tracking(s) from it will be sent to Shopify, and we will complete the fulfillment. After completing fulfillment, no further trackings may be sent, so the second order at the other warehouse will not have its’ tracking numbers sent to Shopify. Similarly, for orders not split across warehouses, but which ship in multiple boxes at different times of day from the same warehouse, only the first shipment will be sent to Shopify. In these cases, the best source for tracking details is Shipwire. If either of these scenarios occur regularly for you, you may wish to disable email notifications in Shopify and instead enable notifications to your customers in Shipwire. This may be found in the Shipwire admin in the menu drop down from your username under Orders & returns settings -> Order confirmation email. Check the option for “When Item Ships (Always Include Tracking?)”
Q. Can I have Shipwire fulfill some products, and fulfill other products on my own or through a supplier/dropshipper?
A. Yes. When Shopify receives an order with products going to multiple fulfillment parties, the Shipwire App will only retrieve the portion of the order with the products that you’ve set for us to fulfill. Shipment/tracking updates will happen as usual. Please note, however, that Shopify does not allow blending of real-time shipping rates, so you will not be able to effectively use our real-time rating option. If you have “Carrier service” enabled on your Shopify App connection, and there is an order with both Shipwire fulfilled items and non Shipwire fulfilled items, we will simply generate a rate based on the SKUs in the order that exist in your Shipwire product catalog. Given this, the best option will be turning off “Carrier service” in your Shopify App connection, and instead using standard Shopify shipping rate settings that work best for you.
Q. How do I enable free shipping for a certain dollar value order?
A. Shopify has this functionality built into their platform. Please see these instructions on their website for setting up. Be sure to use “Free” in your description (such as “Free ground shipping”), and we will interpret this as “GD” shipping when we receive the order, which means we will use our typical algorithms to determine which carrier and ground method to use to save you the most on shipping. If you have real-time rating enabled, and the order value exceeds the amount you chose for free shipping, the free option will by default be chosen for the customer at checkout, but they will still see Shipwire real-time rates, and be able to choose one of them if they would prefer.
Q. How can I create a recurring subscription for my products?
A. Shopify provides this functionality through apps, such as BOLD’s Recurring Orders, ReCharge, Paywhirl and Chargify. Recurring orders will get pushed into Shopify as new orders automatically, and will be passed to Shipwire as per your typical process (manual or automatic, depending on how you’ve set it up).
Q. How do I edit my Shopify App connection options after I’ve installed the App?
A. In your Shipwire account, click the down arrow on your account and select “Third party connectors”, then click the “Configure” button for Shopify. (Or click this direct link). Click on the store name you wish to modify, change the details as desired and click “Update”.
Q. I installed the App before having carrier-calculated rates enabled in my Shopify store, and would like to use real-time rates now, after I installed the App. How do I do this?
A. Fortunately, you can edit your Shopify connection and add real-time rating to your Shopify store. In your Shipwire account, click the down arrow on your account and select “Third party connectors”, then click the “Configure” button for Shopify. (Or click this direct link). Click on the store name you wish to modify, make sure “Carrier service” is checked and click “Update”.
Q. While trying to install the App, I get this error from Shopify: “Oauth error invalid_request: You do not have permission to access the requested scopes”. How do I fix this?
A. This means you are attempting to install the Shipwire App with a staff member account with limited access. Please either ask the administrator or someone with “Full access” to install the App, or provide your account with Full access. See a list of Shopify staff accounts for your store here.
Troubleshooting
Problems sending orders to Shipwire
- Check if your store is configured correctly by signing in to your account and reviewing the instructions under the Sell tab.
- TIP: Orders received on Shopify from before the products were marked as fulfilled by Shipwire cannot later be pushed to Shipwire. Only orders taken after Shipwire is properly configured, and the products in the order are already marked as fulfilled by Shipwire in Shopify are eligible to be pushed to Shipwire. If you have already received an order where one item was not marked as fulfilled by Shipwire that you would like to send, you will need to load the order manually into Shipwire or via CSV import.
Incorrect shipping types
The following can only occur if you are using Shipping rates in your Shopify store besides the “Shipwire App” ones. If you offer multiple shipping types (Shopify calls them ship_type) and orders are coming to Shipwire with the incorrect shipping type, then you don’t have the right mapping between Shopify ship_types and Shipwire shipping methods, and you need to match them.- For example, consider if Shopify captures an order as ‘1-Day Express’. This name (1-Day Express) doesn’t map to any predetermined mappings in Shipwire, so we’re unable to determine the shipping type and will default to Ground Shipping. For International shipping types we do not recognize, it will default to Basic International.
- To automate accurate mapping, rename your current Shopify shipping rates to match the names shown in the example mapping below (i.e. rename ‘1-Day Express’ as ‘1 Day Service’). Once you’ve done this, check Shopify orders against how they are captured in Shipwire to be certain the shiptypes and carriers are correct. The default mapping we follow is as follows:
- If you would like to use shipping service names outside of the ones listed in the above table, please contact customer care and provide a list of all your “Shipping service names” in Shopify, and the service level code (GD, 1D, 2D, INTL) or carrier and shipping method code you would like each to map to. Please note that if you request direct mapping to a particular carrier and shipping method, the method may be changed if it is necessary to deliver (ie, an order comes in mapping to “FedEx Ground Home Delivery” but with a PO Box in the address. This will need to be changed to a USPS service in order to be delivered, since only USPS can deliver to PO Boxes.) Similar issues come up around domestic/international and commercial/residential addresses. Using Shipwire real-time rates is the recommended route to avoid these scenarios.
Shopify rate name Shipwire shipping method 1 Day Service
1 Day (1D)
2 Day Service
2 Day (2D)
Ground Service
Ground (GD)
Freight Service
Freight (FT)
International
International (INTL)
Additional Information and Troubleshooting Tips
We have additional information and troubleshooting tips that apply to shopping cart software in general. This includes more information about how Shipwire does real-time shipping rates via service levels, inventory, and more. Please visit our Cart Troubleshooting Guide.

